Swipe Actions Flutter – Swipe actions are a powerful tool in Flutter. The term “swipe action” refers to the gesture of swiping a finger across a touchscreen to perform an action within an app. This piece will delve into the topic of using swipe gestures in Flutter.
What are swipe actions?
Swipe actions let users interact with apps by swiping. In your app, users can swipe left or right on an item to see more options or delete it. Users can perform actions quickly and easily with swipe actions.
Implementing Swipe actions Flutter
Dismissible will implement swipe actions in Flutter. The Dismissible widget simplifies Flutter swipe actions. Swiping left or right dismisses a list item or card widget wrapped in the Dismissible widget. The widget swipes off-screen and triggers a callback to update the app’s state.
Swipe Actions Flutter using the Dismissible widget:
Widget build(BuildContext context) {
    return Scaffold(
      body: ListView.builder(
        itemCount: items.length,
        itemBuilder: (BuildContext context, int index) {
          final item = items[index];
          return Dismissible(
            key: Key(item),
            onDismissed: (direction) {
              setState(() {
                items.removeAt(index);
              });
              ScaffoldMessenger.of(context).showSnackBar(
                SnackBar(content: Text("$item dismissed")),
              );
            },
            background: Container(color: Colors.red),
            child: ListTile(title: Text('$item')),
          );
        },
      ),
    );
  }
Output
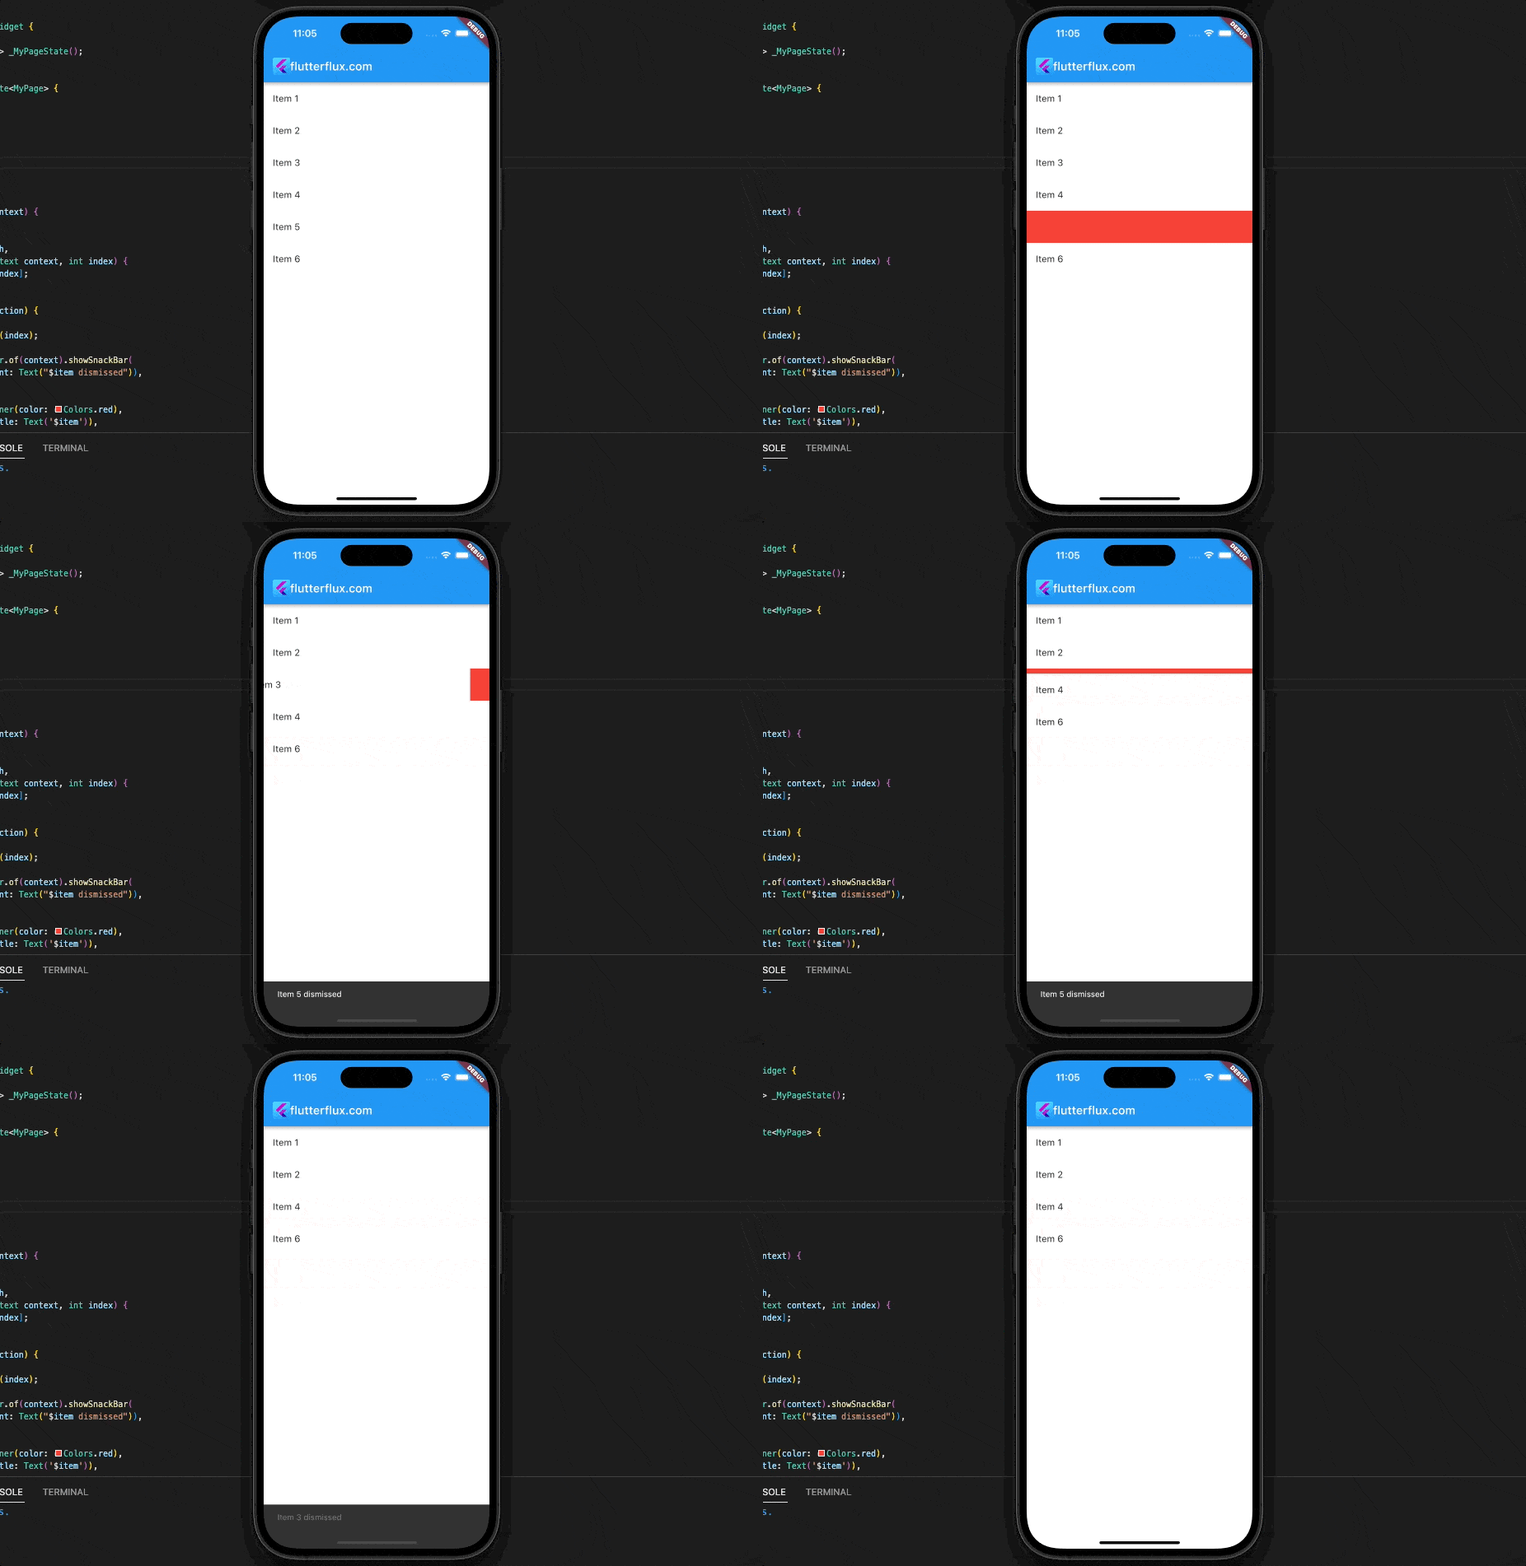
We want to swipe this list. Each list item has its own Dismissible widget and key. Swiping the item left or right invokes the onDismissed callback. We remove the item from the list and show a SnackBar in this callback.
The Dismissible widget background property lets us change the swiped item’s color. This example uses red background.
Customizing Swipe Actions Flutter
There are a number of options for modifying the swipe behavior built into the Dismissible widget. As an illustration, the direction property can be used to specify the swiping motion’s directional constraints. To further personalize the swipe animation, we can adjust the confirmDismiss and movementDuration properties.
One way to customize Swipe Actions Flutter is as shown here.
Widget build(BuildContext context) {
  return Scaffold(
    body: ListView.builder(
      itemCount: items.length,
      itemBuilder: (BuildContext context, int index) {
        final item = items[index];
        return Dismissible(
          key: Key(item),
          direction: DismissDirection.endToStart,
          confirmDismiss: (direction) async {
            return await showDialog(
              context: context,
              builder: (BuildContext context) {
                return AlertDialog(
                  title: const Text("Confirm"),
                  content: const Text("Are you sure you want to delete this item?"),
                  actions: <Widget>[
                    TextButton(
                      onPressed: () => Navigator.of(context).pop(false),
                      child: const Text("CANCEL"),
                    ),
                    TextButton(
                      onPressed: () => Navigator.of(context).pop(true),
                      child: const Text("DELETE"),
                    ),
                  ],
                );
              },
            );
          },
          background: Container(
            alignment: Alignment.centerRight,
            padding: EdgeInsets.only(right: 20.0),
            color: Colors.red,
            child: Icon(Icons.delete, color: Colors.white),
          ),
          movementDuration: Duration(milliseconds: 200),
          child: ListTile(title: Text('$item')),
        );
      },
    ),
  );
}
Output
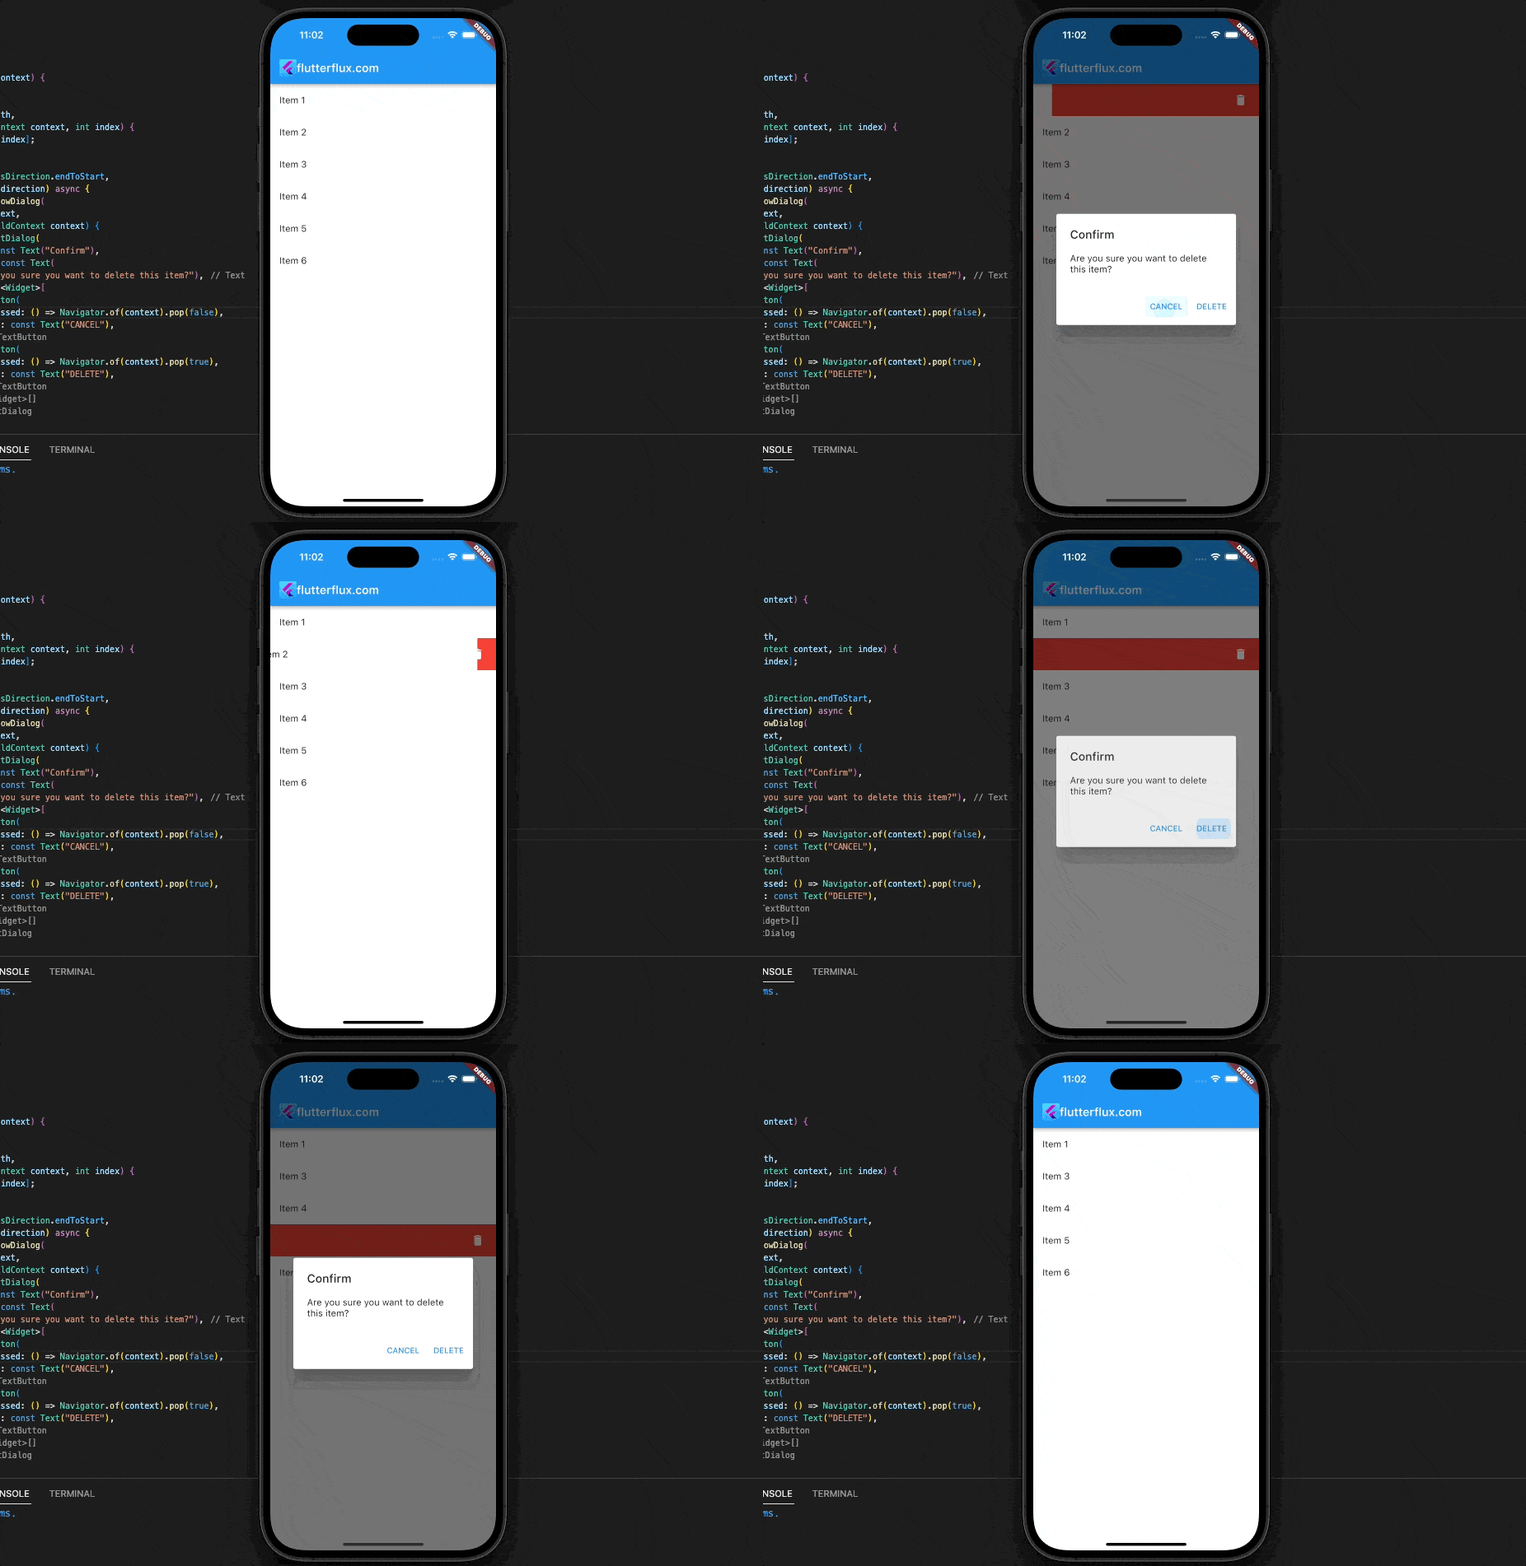
To restrict swiping to only the right-to-left direction, we changed the direction property to endToStart in this case. When the user tries to dismiss the item, a confirmation dialog will pop up because we have set the confirmDismiss property. A red background with a trash can icon has been added via the background property. We’ve also tweaked the swipe animation’s tempo by setting the movementDuration property.
Handling Swipe Actions Flutter
We need to implement logic in app that responds when the user swipes. To do this, we can set a callback function for the Dismissible widget onDismissed property. We can do anything that needs doing in the app in this callback function, such as updating the app’s state or displaying a notification.
To see how Flutter Handling Swipe Actions Flutter, this example:
Widget build(BuildContext context) {
  return Scaffold(
    body: ListView.builder(
      itemCount: items.length,
      itemBuilder: (BuildContext context, int index) {
        final item = items[index];
        return Dismissible(
          key: Key(item),
          onDismissed: (direction) {
            setState(() {
              items.removeAt(index);
            });
            ScaffoldMessenger.of(context).showSnackBar(
              SnackBar(content: Text("$item dismissed")),
            );
          },
          background: Container(
            alignment: Alignment.centerRight,
            padding: EdgeInsets.only(right: 20.0),
            color: Colors.red,
            child: Icon(Icons.delete, color: Colors.white),
          ),
          movementDuration: Duration(milliseconds: 200),
          child: ListTile(title: Text('$item')),
        );
      },
    ),
  );
}
Output
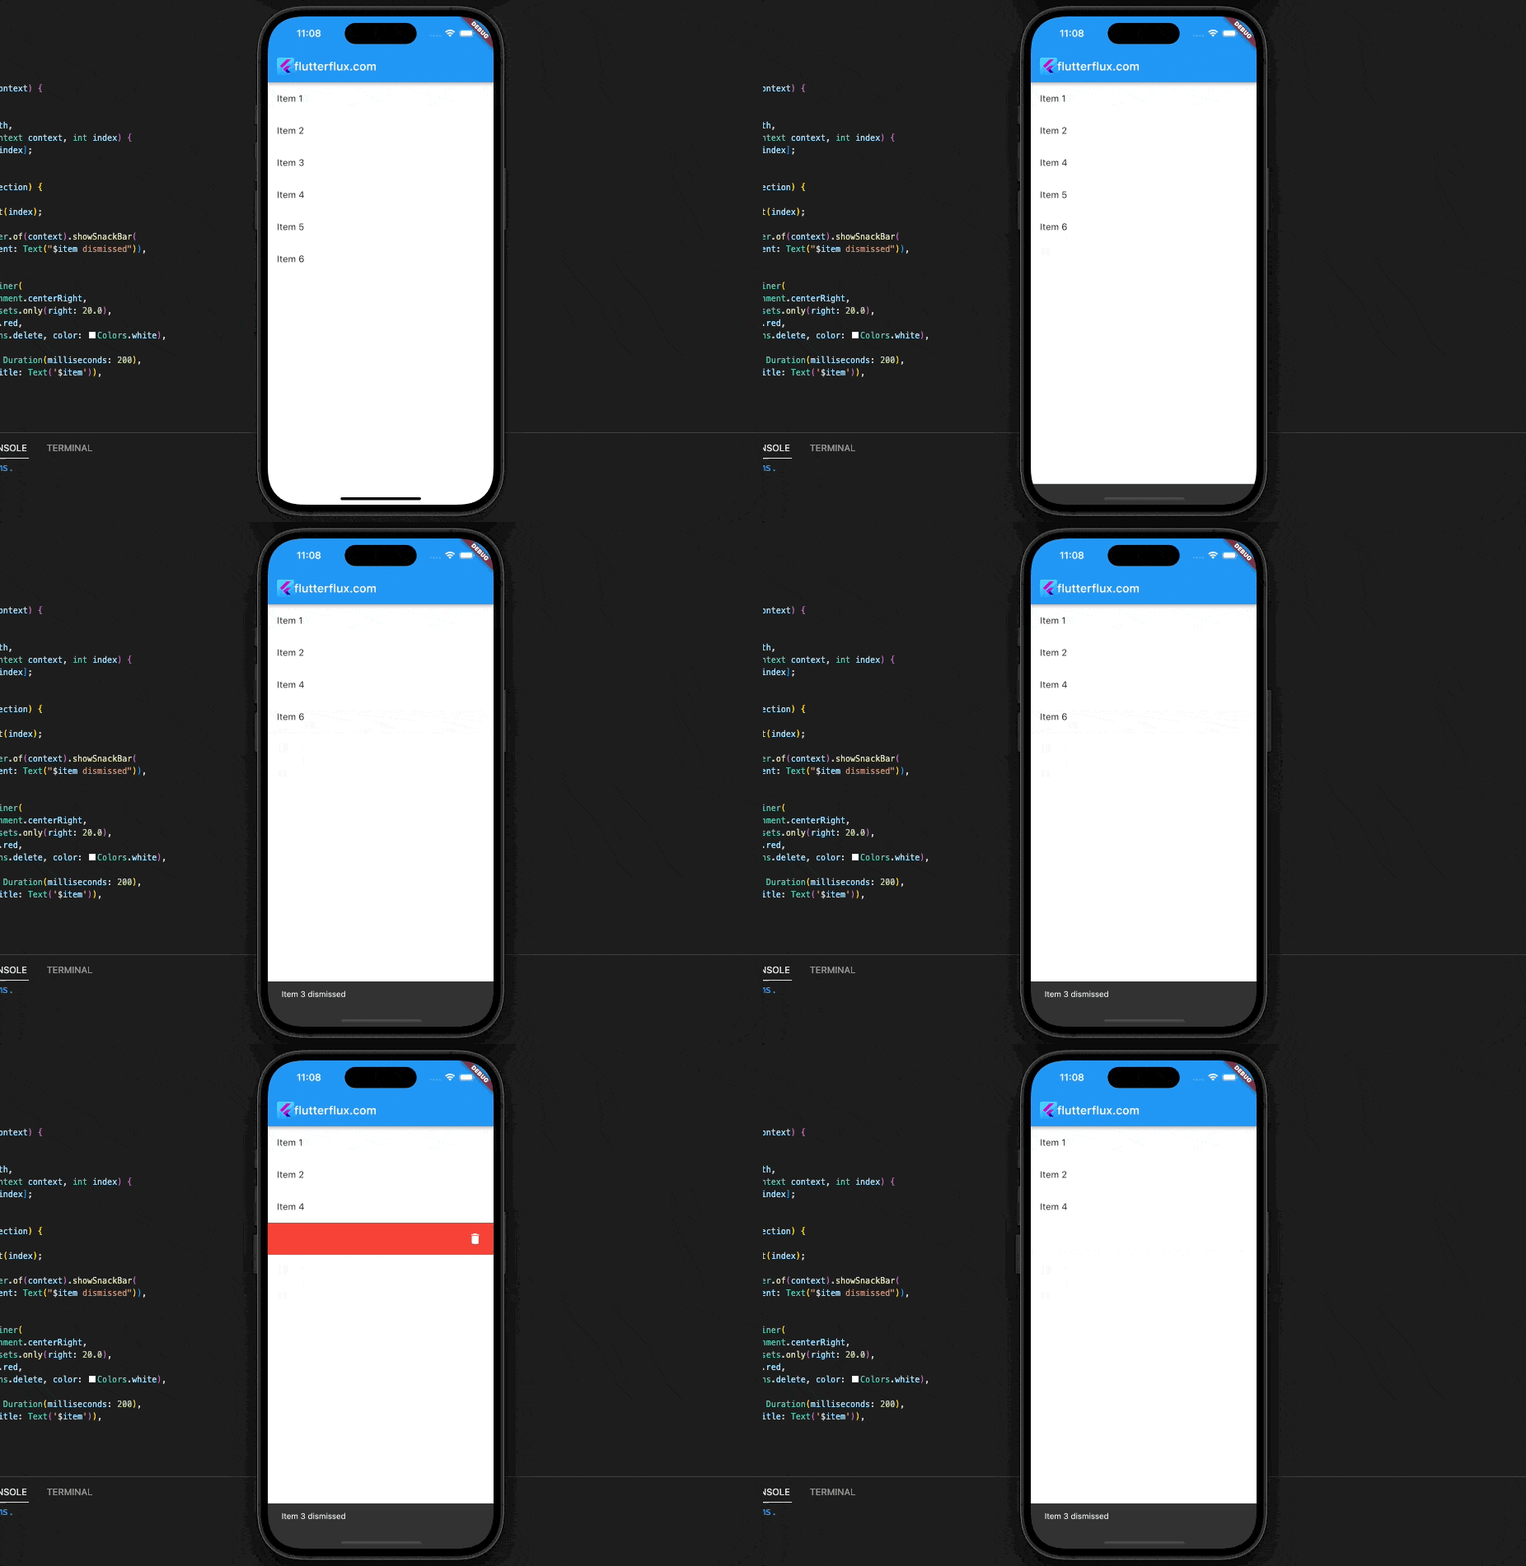
Here, we’ve set up a callback function for the Dismissible widget’s onDismissed property. We then dismiss the item from the list and show a SnackBar to let the user know it has been removed.
Complete code
import 'package:flutter/material.dart';

void main() {
  runApp(MyApp());
}

class MyApp extends StatelessWidget {
  @override
  Widget build(BuildContext context) {
    return MaterialApp(
      title: 'Swipe Action Flutter',
      theme: ThemeData(
        primarySwatch: Colors.blue,
      ),
      home: MyHomePage(),
    );
  }
}

class MyHomePage extends StatefulWidget {
  @override
  _MyHomePageState createState() => _MyHomePageState();
}

class _MyHomePageState extends State<MyHomePage> {
  @override
  Widget build(BuildContext context) {
    return Scaffold(
        appBar: AppBar(
          title: Row(children: [
            Image.asset(
              'assets/logo.png',
              height: 30,
            ),
            Text('flutterflux.com')
          ]),
        ),
        body: MyPage());
  }
}

class MyPage extends StatefulWidget {
  @override
  _MyPageState createState() => _MyPageState();
}

class _MyPageState extends State<MyPage> {
  List<String> items = [
    'Item 1',
    'Item 2',
    'Item 3',
    'Item 4',
    'Item 5',
    'Item 6'
  ];

  Widget build(BuildContext context) {
    return Scaffold(
      body: ListView.builder(
        itemCount: items.length,
        itemBuilder: (BuildContext context, int index) {
          final item = items[index];
          return Dismissible(
            key: Key(item),
            direction: DismissDirection.endToStart,
            confirmDismiss: (direction) async {
              return await showDialog(
                context: context,
                builder: (BuildContext context) {
                  return AlertDialog(
                    title: const Text("Confirm"),
                    content: const Text(
                        "Are you sure you want to delete this item?"),
                    actions: <Widget>[
                      TextButton(
                        onPressed: () => Navigator.of(context).pop(false),
                        child: const Text("CANCEL"),
                      ),
                      TextButton(
                        onPressed: () => Navigator.of(context).pop(true),
                        child: const Text("DELETE"),
                      ),
                    ],
                  );
                },
              );
            },
            background: Container(
              alignment: Alignment.centerRight,
              padding: EdgeInsets.only(right: 20.0),
              color: Colors.red,
              child: Icon(Icons.delete, color: Colors.white),
            ),
            movementDuration: Duration(milliseconds: 200),
            child: ListTile(title: Text('$item')),
          );
        },
      ),
    );
  }
}
Conclusion
In this article, we looked at the Dismissible widget in Flutter and how it can be used to implement Swipe actions Flutter. In addition, we have adapted Swipe Actions Flutter and talked about how to manage them in our app. Using these methods, we can make Flutter apps with fantastic user experiences. read too Flutter InputChip Example

