Chewie is a Flutter package, offers a customisable movie player widget. It adds video playback controls and support for several video codecs to video_player. Chewie in Flutter simplifies video in apps.
We’ll develop a bespoke movie player widget in Flutter using Chewie in this tutorial. We will cover the basics of integrating Chewie in Flutter project and some advanced capabilities like customising the video player, optimising video performance, and connecting with other Flutter packages and plugins.
Getting started with Chewie in Flutter
To get started with Chewie in Flutter, follow these steps:
- Add Chewie to your Flutter pubspec.yaml file:
dependencies:
  chewie: ^1.4.0
- Run
flutter packages getto install the Chewie package. - Import the Chewie package and the video_player package in your Project:
import 'package:chewie/chewie.dart';
import 'package:video_player/video_player.dart';
- Load your video with a
VideoPlayerControllerinstance:
final videoPlayerController = VideoPlayerController.asset('assets/video.mp4');
- Start a
ChewieControllerusing your VideoPlayerController:
final chewieController = ChewieController(
  videoPlayerController: videoPlayerController,
  aspectRatio: 16 / 9, // Optional
  autoPlay: true, // Optional
  looping: true, // Optional
);
- Last, create Chewie widget and pass in the
ChewieController:
Chewie(
  controller: chewieController,
);
Flutter has a basic video player. Colours, subtitles, and playback speed can be sent to the ChewieController to customise the player. Avoid memory leaks by removing the ChewieController and VideoPlayerController objects:
@override
void dispose() {
  videoPlayerController.dispose();
  chewieController.dispose();
  super.dispose();
}
Building a custom video player with Chewie in Flutter
Chewie lets you construct a Flutter video player with a customisable widget. We’ll use Chewie in Flutter to create a bespoke video player.
- As mentioned in the last step, create a new Flutter project and add the Chewie package to pubspec.yaml.
- Import the
Chewieandvideo_playerpackages in your Dart code:
import 'package:chewie/chewie.dart';
import 'package:video_player/video_player.dart';
- Load your video with a
VideoPlayerControllerinstance:
final videoPlayerController = VideoPlayerController.asset('assets/video.mp4');
- Start a
ChewieControllerusing yourVideoPlayerController:
final chewieController = ChewieController(
  videoPlayerController: videoPlayerController,
  aspectRatio: 16 / 9,
  autoPlay: true,
  looping: true,
  // Additional customizations can be added here
);
- Create a StatefulWidget for a custom video player:
class CustomVideoPlayer extends StatefulWidget {
  @override
  _CustomVideoPlayerState createState() => _CustomVideoPlayerState();
}

class _CustomVideoPlayerState extends State<CustomVideoPlayer> {
  ChewieController _chewieController;

  @override
  void initState() {
    super.initState();
    _chewieController = ChewieController(
      videoPlayerController: videoPlayerController,
      aspectRatio: 16 / 9,
      autoPlay: true,
      looping: true,
      // Additional customizations can be added here
    );
  }

  @override
  Widget build(BuildContext context) {
    return Chewie(
      controller: _chewieController,
    );
  }

  @override
  void dispose() {
    _chewieController.dispose();
    super.dispose();
  }
}
- In your build method, invoke the custom video player widget:
@override
Widget build(BuildContext context) {
  return Scaffold(
    appBar: AppBar(
      title: Text('Custom Video Player'),
    ),
    body: Center(
      child: CustomVideoPlayer(),
    ),
  );
}
Colors, subtitles, and playback speed can be sent to the ChewieController to customise the player. Your Flutter app’s video playback experience is fully customizable with Chewie bespoke video player.
Full code
import 'package:flutter/material.dart';
import 'package:chewie/chewie.dart';
import 'package:video_player/video_player.dart';

void main() {
  runApp(MyApp());
}

class MyApp extends StatelessWidget {
  @override
  Widget build(BuildContext context) {
    return MaterialApp(
      title: 'Custom Video Player',
      home: CustomVideoPlayer(),
    );
  }
}

class CustomVideoPlayer extends StatefulWidget {
  @override
  _CustomVideoPlayerState createState() => _CustomVideoPlayerState();
}

class _CustomVideoPlayerState extends State<CustomVideoPlayer> {
  VideoPlayerController videoPlayerController;
  ChewieController chewieController;

  @override
  void initState() {
    super.initState();
    videoPlayerController = VideoPlayerController.asset('assets/BigBuckBunny.mp4');
    chewieController = ChewieController(
      videoPlayerController: videoPlayerController,
      aspectRatio: 16 / 9,
      autoPlay: true,
      looping: true,
      // Additional customizations can be added here
    );
  }

  @override
  Widget build(BuildContext context) {
    return Scaffold(
      appBar: AppBar(
        title: Text('Custom Video Player'),
      ),
      body: Center(
        child: Chewie(
          controller: chewieController,
        ),
      ),
    );
  }

  @override
  void dispose() {
    videoPlayerController.dispose();
    chewieController.dispose();
    super.dispose();
  }
}
We’re loading a video from assets/BigBuckBunny.mp4 in this example. Videos can also be loaded from network URLs or device storage. To do so, replace VideoPlayerController.asset('assets/BigBuckBunny.mp4') with the appropriate constructor (e.g., VideoPlayerController.network(‘https://example.com/BigBuckBunny.mp4’) for loading a video from a network URL).
Styling your video player with Chewie in Flutter
Chewie lets you customise video player colors, subtitles, playing speed, and more. This section covers Chewie in Flutter video player styling options.
- Customizing the colors of your video player:
final chewieController = ChewieController(
  videoPlayerController: videoPlayerController,
  aspectRatio: 16 / 9,
  autoPlay: true,
  looping: true,
  materialProgressColors: ChewieProgressColors(
    playedColor: Colors.red,
    handleColor: Colors.redAccent,
    backgroundColor: Colors.grey,
    bufferedColor: Colors.white,
  ),
);
We’re customising the video player’s progress bar and other UI elements using the ChewieController materialProgressColors parameter. Any Color value can be provided for playedColor, handleColor, backgroundColor, and bufferedColor.
- Video subtitles:
final chewieController = ChewieController(
  videoPlayerController: videoPlayerController,
  aspectRatio: 16 / 9,
  autoPlay: true,
  looping: true,
  subtitle: Subtitles([
    Subtitle(
      index: 0,
      start: Duration(seconds: 0),
      end: Duration(seconds: 5),
      text: 'Hello, world!',
    ),
    Subtitle(
      index: 1,
      start: Duration(seconds: 5),
      end: Duration(seconds: 10),
      text: 'How are you?',
    ),
  ]),
);
This example adds subtitles to our video player using the ChewieController subtitle attribute. Subtitle objects with indexes, start times, end times, and text values are passed in.
- Adjusting your video player’s playback speed:
final chewieController = ChewieController(
  videoPlayerController: videoPlayerController,
  aspectRatio: 16 / 9,
  autoPlay: true,
  looping: true,
  playbackSpeeds: [
    0.25,
    0.5,
    1,
    1.5,
    2,
  ],
);
We’re using the ChewieController playbackSpeeds property to list the user’s playback rates. This property accepts any double value list.
- Customising video player controls:
final chewieController = ChewieController(
  videoPlayerController: videoPlayerController,
  aspectRatio: 16 / 9,
  autoPlay: true,
  looping: true,
  customControls: CustomControls(
    children: [
      IconButton(
        icon: Icon(Icons.favorite),
        onPressed: () {
          // Do something
        },
      ),
    ],
  ),
);
We’re utilising the ChewieController customControls property to set our video player’s controls in this example. We give in a CustomControls object with an array of child widgets (an IconButton with a onPressed callback). This method lets you customise video player controls.
Full code
import 'package:flutter/material.dart';
import 'package:video_player/video_player.dart';
import 'package:chewie/chewie.dart';

void main() => runApp(MyApp());

class MyApp extends StatelessWidget {
  @override
  Widget build(BuildContext context) {
    return MaterialApp(
      title: 'Chewie Demo',
      home: ChewieDemo(),
    );
  }
}

class ChewieDemo extends StatefulWidget {
  @override
  _ChewieDemoState createState() => _ChewieDemoState();
}

class _ChewieDemoState extends State<ChewieDemo> {
  late VideoPlayerController videoPlayerController;
  late ChewieController chewieController;

  @override
  void initState() {
    super.initState();
    videoPlayerController =
        VideoPlayerController.asset('/assets/BigBuckBunny.mp4');
    chewieController = ChewieController(
      videoPlayerController: videoPlayerController,
      aspectRatio: 16 / 9,
      autoPlay: true,
      looping: true,
      materialProgressColors: ChewieProgressColors(
        playedColor: Colors.red,
        handleColor: Colors.redAccent,
        backgroundColor: Colors.grey,
        bufferedColor: Colors.white,
      ),
      subtitle: Subtitles([
        Subtitle(
          index: 0,
          start: Duration(seconds: 0),
          end: Duration(seconds: 5),
          text: 'Hello, world!',
        ),
        Subtitle(
          index: 1,
          start: Duration(seconds: 5),
          end: Duration(seconds: 10),
          text: 'How are you?',
        ),
      ]),
      playbackSpeeds: [
        0.25,
        0.5,
        1,
        1.5,
        2,
      ],
    );
  }

  @override
  Widget build(BuildContext context) {
    return Scaffold(
      appBar: AppBar(
        title: Row(children: [
          Image.asset(
            'assets/logo.png',
            height: 30,
          ),
          Text('flutterflux.com')
        ]),
      ),
      body: Column(
        children: [
          Expanded(
            child: Center(
              child: Chewie(
                controller: chewieController,
              ),
            ),
          ),
        ],
      ),
    );
  }

  @override
  void dispose() {
    super.dispose();
    videoPlayerController.dispose();
    chewieController.dispose();
  }
}
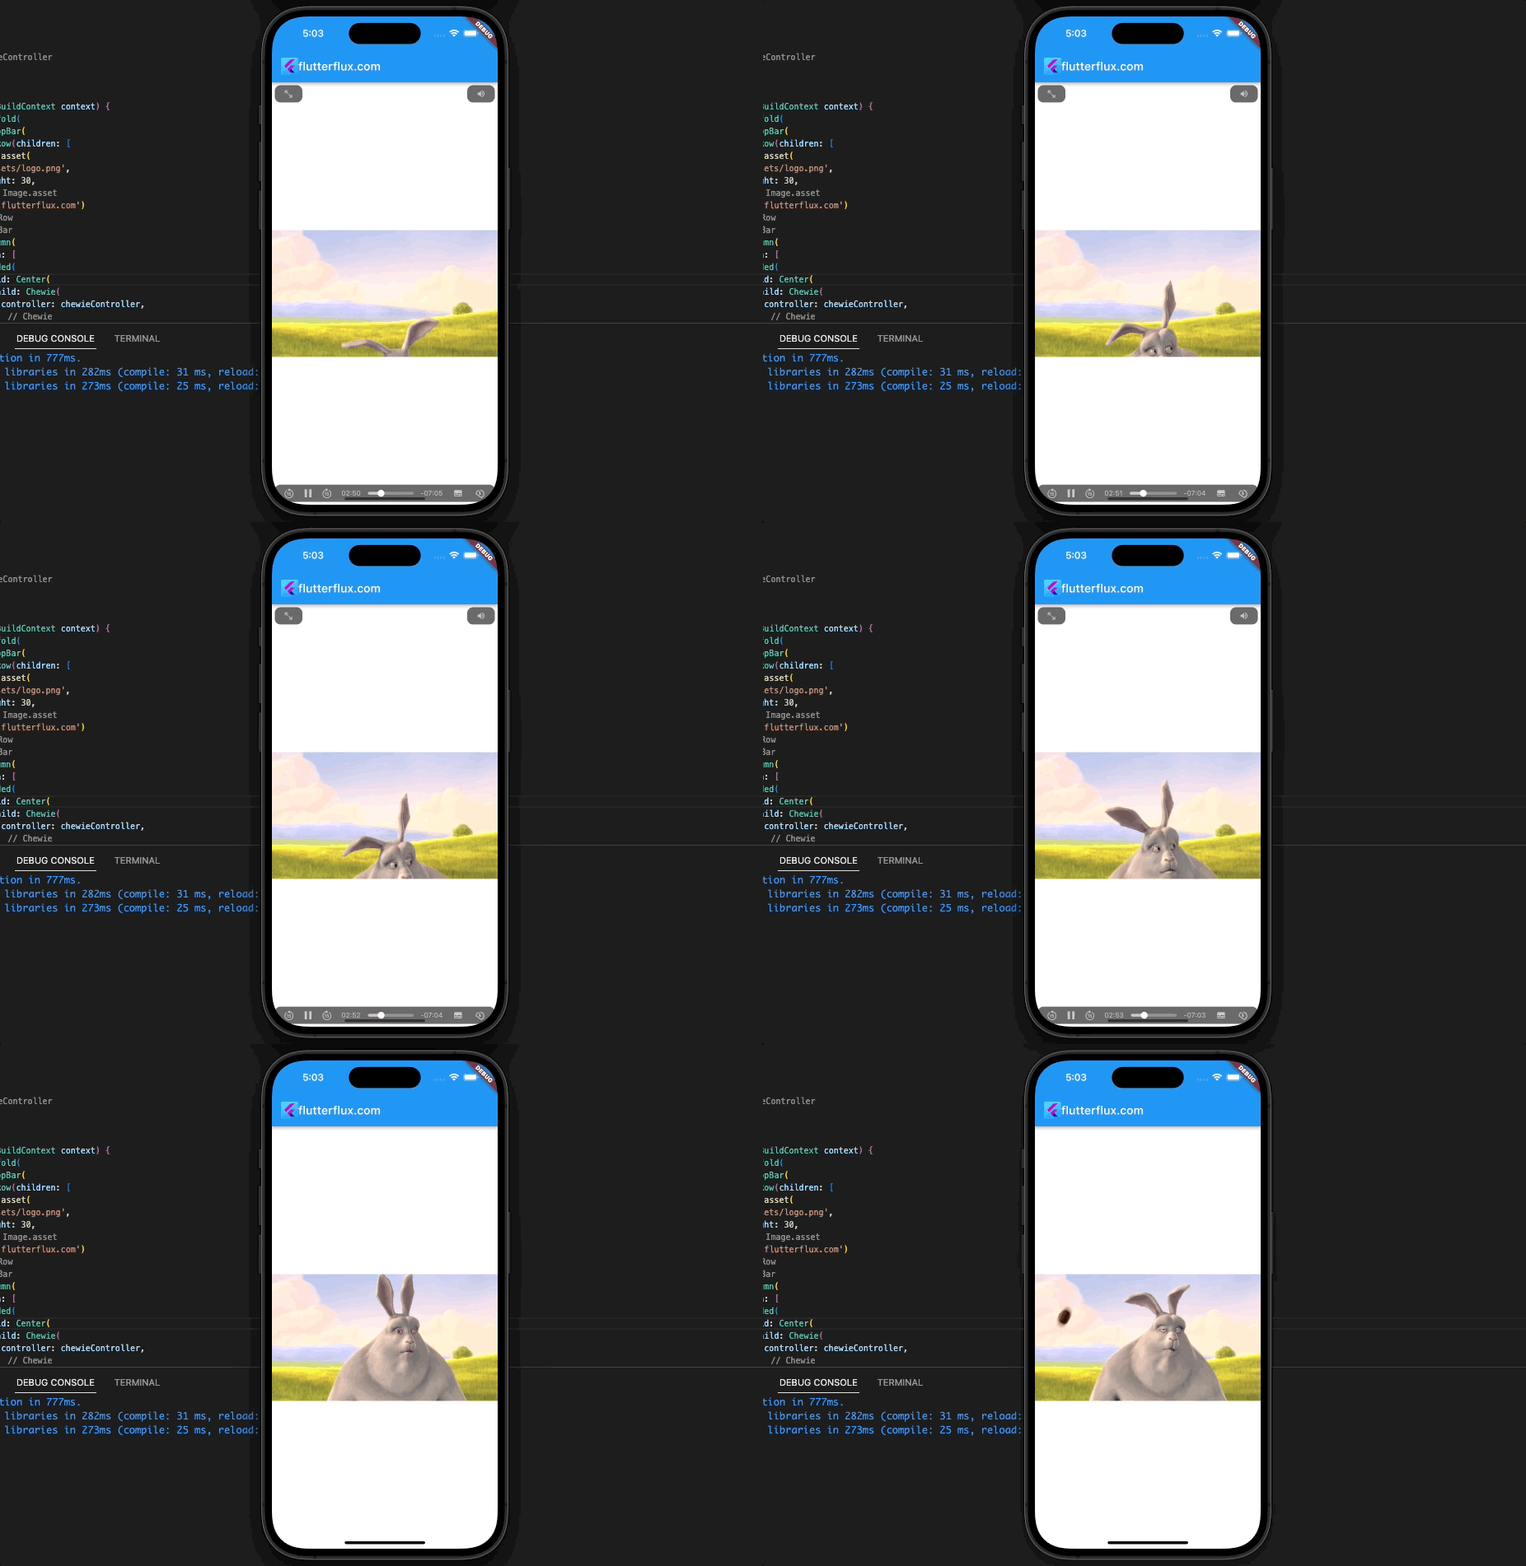
This Chewie-based Flutter video player has unique colors, subtitles, playback rates, and controls. This code requires the chewie and video_player dependencies in pubspec.yaml.
Advanced video playback with Chewie in Flutter
Chewie in Flutter has extensive video playback features. This section will cover some of these features and their implementation.
Video quality switching
Chewie simplifies video quality switching. Create a list of video sources with varying qualities and provide it to the videoPlayerController as seen in the code below:
videoPlayerController = VideoPlayerController.network(
    'https://flutter.github.io/assets-for-api-docs/assets/videos/butterfly.mp4',
    videoPlayerOptions: VideoPlayerOptions(mixWithOthers: true),
    // Define the list of video qualities
    dataSource: ConcatenatingDataSource(
      // Define the first quality
      children: [
        DataSource.network(
          'https://example.com/video_720p.mp4',
          headers: {'header_key': 'header_value'},
        ),
        // Define the second quality
        DataSource.network(
          'https://example.com/video_1080p.mp4',
          headers: {'header_key': 'header_value'},
        ),
      ],
    ),
);

chewieController = ChewieController(
  videoPlayerController: videoPlayerController,
  aspectRatio: 16 / 9,
  autoPlay: true,
  looping: true,
);
The code above defines 720p and 1080p video qualities. The ConcatenatingDataSource class defines a collection of DataSource objects with varied qualities. The VideoPlayerController.network constructor’s dataSource parameter receives this list.
Video caching
Caching can improve video playback on sluggish networks. CachedVideoPlayerController supports video caching in Chewie.
Add the cached_video_player requirement to pubspec.yaml to use Chewie caching. After that, use the CachedVideoPlayerController class instead of the usual VideoPlayerController class:
videoPlayerController = CachedVideoPlayerController.network(
    'https://flutter.github.io/assets-for-api-docs/assets/videos/butterfly.mp4');
The CachedVideoPlayerController object created by this code automatically caches the video at the supplied URL. For following video viewing sessions, the cache will be used.
Picture-in-picture (PIP) mode
Picture-in-Picture (PIP) mode lets users watch videos while using other programmes or the system UI in Chewie. Only Android and iOS support PIP mode.
To enable PIP mode with Chewie in Flutter, create a ChewieController using the enableFullScreen: false parameter:
chewieController = ChewieController(
  videoPlayerController: videoPlayerController,
  aspectRatio: 16 / 9,
  autoPlay: true,
  looping: true,
  enableFullScreen: false,
);
This code ensures that the user is given the choice to switch to PIP mode rather than full screen mode if full screen mode is activated.
Tips for optimizing video performance with Chewie in Flutter
Chewie in Flutter video optimisation tips:
- Use compressed videos: Large videos can buffer and play slowly. Before uploading videos to your app, compress them.
- Use a video caching library: Caching boosts video playback. Cache videos with
flutter_cache_managerorcached_network_image. - Choose the appropriate video format: Select a mobile-friendly video format.
H.264is supported by most mobile devices. - Optimize video encoding settings: Optimise mobile video encoding. This reduces file size and improves playback.
- Use hardware acceleration: Video playback hardware acceleration offloads video decoding to the device. This boosts performance and saves battery.
- Minimize UI updates: Play videos without UI updates. Dropped frames can affect performance.
- Use a video player with a small memory footprint: Select a low-memory video player.
Chewieis built on the memory-efficientvideo_playerpackage.
You may improve your app’s video playback experience with Chewie by following these guidelines.
Conclusion
Chewie, a sophisticated Flutter video player plugin, lets developers effortlessly integrate video playback to their projects. Developers may add autoplay, looping, and captions to Chewie in Flutter video player while branding it to their app.
To utilise Chewie in Flutter efficiently, initialise the video player controller, set the video source, and handle video playback issues. To boost video speed, developers should optimise video encoding settings and use hardware acceleration. Read too 7 Ways to Use Shared Preferences in Flutter

